

The Complete Pipeline from Genotyping to Mixture Analysis Series
- Part 1 of Forensic DNA Analysis Series
This article covers Part 1 of our three-part series on forensic CE data analysis.
- Establishing settings for Genotyping
- Methods to evaluate number of contributors in DNA mixture
- Brief overview of MCMC method for Probabilistic Genotyping
Capillary Electrophoresis (CE) is currently the standard method forensic labs use to analyze STRs from crime scene samples. However, setting up a lab's SOPs for CE analysis of STRs is typically performed by a validation team, which means casework analysts might not be familiar with everything that goes into getting a CE workflow put in place.
What is Capillary Electrophoresis (CE) in Forensic Science?
Capillary Electrophoresis (CE) is a crucial tool in forensic DNA analysis, providing accurate methods for DNA profiling from crime scene samples. By separating DNA fragments based on size and charge, CE enables forensic scientists to analyze Short Tandem Repeats (STRs)—highly variable regions in human DNA that are essential for identification and matching biological evidence.
During the forensic CE process, DNA fragments are separated in a capillary tube filled with a buffer solution. An electric field is applied, causing DNA fragments to migrate at different rates depending on their size. The resulting electropherogram is then analyzed to assign STR alleles and construct a DNA profile.
5 Steps for Optimizing Settings for Forensic Genotyping
1. Determining Analytical Threshold (AT)

Proper analytical thresholds are vital for accurate forensic capillary electrophoresis interpretation. The analytical threshold (AT) in forensic DNA represents the minimum peak height at which a signal can be distinguished from background noise with statistical confidence. Setting appropriate ATs is crucial as they directly impact whether true allelic peaks are detected or missed during analysis.
References and Examples
There are numerous validated methodologies for establishing analytical thresholds:
- The Organization of Scientific Area Committees (OSAC) guidelines reference nine statistical methods for determining AT
- *Dr. C. Grgicak has detailed five methods in "Module 3: Setting Analytical Threshold"
- These include three methods using negative controls and two methods using samples with amplicons
*21st International Symposium on Human Identification Mixture Interpretation Workshop: Principles, Protocols, and Practice, October 11, 2010 – San Antonio, TX
It's worth noting that older methods based on extreme value calculations (e.g., 2X peak-to-trough difference) are no longer recommended by OSAC as they "do not address the statistical confidence of a given analytical threshold" and "can be easily skewed by outlier data."

A common recommended method follows these steps:
- Amplify samples following your lab's SOP
- Collect FSA files from the capillary electrophoresis instrument
- Analyze FSA files at 1 RFU (no Y-axis requirements, no filters)
- Delete all actual amplicons, stutter peaks, and known artifacts to isolate noise
- Export data to a spreadsheet and calculate the average noise and standard deviation for each dye
- Calculate AT as average noise + 3 × standard deviation
Implementation
When implementing analytical thresholds:
- Choose a statistically robust method appropriate for your laboratory's instrumentation
- Document the validation process thoroughly
- Regularly verify that established thresholds remain appropriate as conditions change
- Consider dye-specific thresholds when necessary
GeneMarkerHID software provides a validation assistance tool specifically for determining analytical thresholds. This automated tool can significantly reduce the time-consuming process of manually removing artifact peaks, ensuring consistent application of rules, and eliminating the potential for missing peaks during the manual deletion process.
2. Using Allele-Specific Stutter Filters

Background
Stutter artifacts—smaller peaks that appear adjacent to true alleles—are common in CE analysis and must be properly identified. Traditional approaches use marker-specific stutter filters in forensic genetics (typically average + 3 standard deviations), but these fail to account for variations within markers.
Stutter patterns vary significantly based on:
- Length of the repeat
- Complexity of the repeat sequence
- Size of the marker
- Size range of the marker
- Position and additive impact of the stutter
When stutter filters are set too high, minor contributor peaks may be missed. When set too low, the number of required analyst interventions increases, as does the potential for mistakenly including artifact peaks in DNA mixture interpretation.

The impact of stutter varies dramatically between different repeat types:
- Trinucleotide repeats typically exhibit much higher stutter percentages, with pronounced stutter in both minus and plus positions
- Pentanucleotide repeats generally show much lower stutter levels
- Homogeneous repeats (consistent repeat pattern) typically show linear stutter patterns, primarily at the minus one position
- Heterogeneous repeats (complex repeat patterns like SE33) display more complex stutter patterns with minus two base pair, minus one repeat (four base pair), and plus two base pair positions
For complex markers, stutter patterns may follow a bimodal distribution based on the longest uninterrupted stretch (LUS) of repeats. Different alleles within the same marker can have significantly different stutter percentages, ranging from as low as 5% to nearly 18% in some cases.
Advantages
Allele-specific stutter filters offer significant advantages over traditional marker-wide filters:
- More accurate stutter identification based on specific allelic characteristics
- Reduced need for analyst intervention and manual edits
- Better discrimination between true alleles and stutter in complex mixtures
- Fewer missed minor contributor alleles
- Greater consistency between analysts
Research by Dr. John Shiman and colleagues at the Connecticut State Lab demonstrated these advantages through validation studies:
- In 82 two-person mixtures, allele-specific filters failed to filter only 4 stutter peaks, while traditional locus-specific filters missed 23 stutter peaks and incorrectly filtered 7 real peaks
- In 4 three-person mixtures, allele-specific filters failed to filter 5 stutter peaks and filtered 2 actual allele peaks, while locus-specific filters failed to filter 38 stutter peaks and incorrectly filtered 13 actual allele peaks
Implementation
To implement allele-specific stutter filters:
- Analyze a large dataset of single-source samples
- Calculate stutter ratios for each allele within each marker
- Plot the ratios against allele size to identify patterns
- Establish allele-specific thresholds based on this data
- Validate the thresholds with known mixtures
- Incorporate the filters into your analysis software templates
Software like GeneMarkerHID allows you to set specific stutter percentages for each position type (minus, plus) for each allele, ensuring accurate filtering even in complex mixture situations.
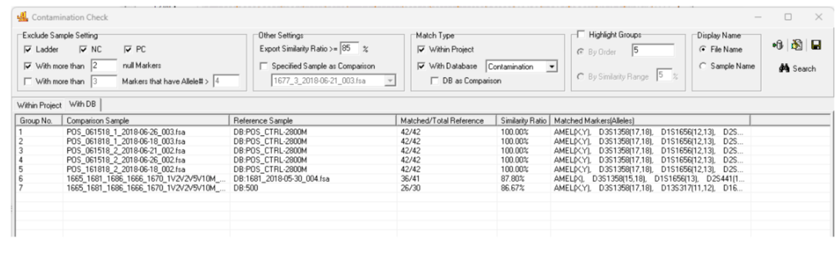
3. Establishing and Using a Contamination Database
 Introduction
Even with stringent protocols, contamination remains a persistent concern in forensic laboratories. A comprehensive DNA contamination database helps identify potential sources of contamination quickly and efficiently.
A contamination database should include DNA profiles from:
- Laboratory personnel
- Reagent manufacturers
- Regular visitors to the laboratory
- Known contamination events from the past
Implementation
To establish an effective contamination database:
- Collect reference samples from all laboratory personnel and regular visitors
- Generate complete DNA profiles using the same protocols used for casework
- Integrate the database with your analysis software for automated checking
- Establish clear protocols for when a potential contamination is identified
- Update the database regularly as personnel changes occur
- Document all contamination events and corrective actions
GeneMarker HID software enables contamination checks against your elimination database with just a few clicks. The software can automatically flag matches between casework samples and profiles in your contamination database, with adjustable settings to account for the complexity of mixture samples.
4. Other Critical Considerations
 Control Concordance
Positive and negative controls are vital for ensuring the reliability of the analysis:
Positive Controls
- Extraction positives ensure extraction methods are working properly
- Amplification positives with established STR profiles confirm that the amplification process works correctly
- These controls verify that all stages of the analytical process are functioning as expected
Negative Controls
- No DNA controls
- Reagent blanks
- Water blanks
- These controls contain no DNA and are used to identify contamination in the process—if peaks are detected in a negative control, it suggests contamination
Internal Control Probes
Forensic internal control probes are essential to verify the validity of CE results:
- Q and S Probes: The Q probe monitors PCR efficiency, while the S probe checks for sample degradation
- A failure in these controls indicates potential issues that need addressing
- Modern analysis software can automatically evaluate these probes to ensure sample integrity

GeneMarker HID software automatically evaluates these patterns and flags potential issues, helping analysts quickly identify the root cause of problems and determine appropriate next steps. This automation enhances efficiency and consistency in the interpretation of control results.
Analysis Templates
Forensic labs must use standardized analysis templates to define important parameters for each sample. Templates ensure consistency, reduce user variability, and simplify the analysis process.
Key template parameters include:
- Size Standards: Reference markers used to calibrate the capillary electrophoresis system
- Panel Configuration: A predefined selection of STR loci to be tested
- Peak Calling: Defining thresholds for peak detection
Templates should also:
- Be validated during method implementation
- Include all necessary parameters (thresholds, filters, etc.)
- Be protected from unauthorized changes
- Be subject to version control
To prevent accidental modifications to validated templates, software should implement user access rights where administrators establish and modify settings, while routine analysts can only apply—but not modify—validated templates. GeneMarkerHID implements this through user management controls that restrict access to template modification based on user roles.
CODIS/LIMS Compatible Reporting
A Laboratory Information Management System (LIMS) plays a critical role in managing forensic data and streamlining workflows. By integrating with CE instruments, LIMS helps track samples, store results, and generate reports efficiently.
Key LIMS features include:
- Sample Tracking: Every sample receives a unique identifier, ensuring it can be traced throughout the analysis process
- Data Management: LIMS stores all analytical data, linking it to case files and ensuring proper organization
- Report Generation: Automated report generation ensures consistency and reduces human error
For efficient workflow integration:
- Reports should be standardized and compatible with CODIS requirements
- LIMS integration should be seamless
- Report formats should be established by administration and locked for routine analysis
- Customization options should be limited to prevent inconsistencies
This integration reduces administrative workload and enhances the overall efficiency of forensic data management.
GeneMarkerHID's CODIS-compatible reporting automatically excludes samples with quality flags, ensuring only high-quality data is exported. The software allows administrators to establish LIMS report settings, with locked configurations that prevent analysts from accidentally changing report formats and creating compatibility issues with the laboratory's LIMS system.
User Access Rights
Implementing tiered user access ensures validated SOPs are followed:
- Administrators establish and modify settings
- Analysts apply but cannot modify validated templates
- All changes are tracked in the audit system
- Training requirements are documented before access is granted
5. Comprehensive Audit Trails

An audit trail records all actions taken during the analysis, ensuring full traceability of edits and changes. This is crucial for maintaining evidence integrity and accountability, especially when the data is used in legal proceedings.
Within Sample
Each sample should have its own audit trail that documents:
- Original raw data
- All analytical parameters applied
- Every edit made to the data
- Who made each edit and when
- Rationale for any manual interventions
This level of documentation ensures that the analysis of each sample can be reconstructed if necessary. When an analyst makes edits to genotyping data, such as deleting a peak, GeneMarkerHID prompts them to add comments explaining the rationale. These comments are stored with the project and can be referenced later to justify decisions. The software provides customizable comment templates for commonly used explanations, streamlining the documentation process while ensuring thoroughness.
Within Projects
Project-level audit trails capture broader actions:
- Creation and modification of analysis templates
- Changes to project settings
- User access and activities
- Quality control outcomes
- Report generation and distribution
Implementing robust Quality Assurance (QA) and Quality Control (QC) procedures in forensic labs is vital to ensure accurate and reproducible results. Modern forensic DNA software includes automated quality flags that provide analysts with real-time alerts:
- Low Peak Intensity: Indicates possible PCR failure or degraded samples
- Peak Shifting: Suggests issues with the electrophoresis process
- Sample Degradation: Identified by a significant decrease in peak intensity
GeneMarkerHID generates comprehensive audit trails for reporting for entire projects, capturing analyst IDs, software versions, institution names, and all edits made throughout the analysis process. These audit trails can span dozens of pages for complex projects and can be saved as PDFs or reviewed within the software. This comprehensive documentation is essential for courtroom testimony and for meeting accreditation requirements such as ISO 17025.

Conclusion
Establishing clear workflows and standardized analysis parameters is essential for the success of forensic capillary electrophoresis (CE) data analysis.
By implementing effective SOPs, using internal controls, automating quality checks, and integrating LIMS systems, forensic labs can ensure accurate, reproducible, and legally sound results.
These practices ultimately support justice by delivering reliable forensic evidence that stands up to scrutiny in court. The field of forensic DNA analysis continues to evolve, but these fundamental principles provide a solid foundation for generating accurate, reproducible, and legally sound results that serve the justice system effectively.
By standardizing the entire process from sample collection to final report generation, forensic labs maintain high standards and ensure results that are both reliable and defensible in a court of law.
Get Started with SoftGenetics
Sign up to start your free 35-day trial! No credit card, no commitment required.
Start your free 35-day trial now.
This article covers Part 1 of our three-part series on forensic CE data analysis.
- Establishing settings for Genotyping
- Methods to evaluate number of contributors in DNA mixture
- Brief overview of MCMC method for Probabilistic Genotyping